10 June 2007: The Only Good Holding Tank is a Big Enough Holding Tank.
Its been a while since I wrote anything and a lot has been accomplished. Lets start with one of the current projects: the holding tank and the head. Our Islander 28 came with a rubber holding bladder, which was pretty fragrantly obnoxious after 30 years. In addition, the vent line was plugged, so when the bladder filled up, waste would begin to leak back into the head. Better than the bladder bursting, I guess. The Wilcox-Crittendon bladder probably held five gallons, certainly not more than 10. I think "big enough" holding-tank-wise, is more on the order of a gallon per foot of boat, minimum. I won't claim to follow all the rules, but I do think discharging sewage into a marina is particularly gross. I also think a lot more people do it than will admit to it. If marinas really cared about the problem they would all regularly put dye tablets in boater's heads, as they do in Avalon harbor.
Anyway, with careful attention and using minimal flush water, Julie and I
could go several days on the boat between pump-out runs to the open
ocean. A pump-out run is also an excuse to go sailing, so that isn't all
bad. But a boat that's a little smelly is an excuse for the wife to want
to stay home, so fixes were in order. In mid-April I carefully
measured the space available. The 18 gallon fresh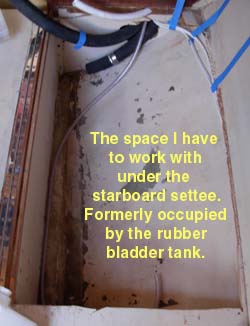 water tank is aft
under the starboard
water tank is aft
under the starboard  settee and the bladder and macerator were forward. I
calculated the largest Ronco standard tank that would fit, did drawings and
everything. At the end of May I took delivery of a B-170 28 gallon
rotary-molded polyethylene tank. The tank is roughly a right triangle in
cross section to fit the curve of the hull and it narrows down a little at the
forward end as the hull curves in toward the pointy end of the boat. The
tank turned out to be just a teeny bit too big at the forward outside
corner. Oops.
settee and the bladder and macerator were forward. I
calculated the largest Ronco standard tank that would fit, did drawings and
everything. At the end of May I took delivery of a B-170 28 gallon
rotary-molded polyethylene tank. The tank is roughly a right triangle in
cross section to fit the curve of the hull and it narrows down a little at the
forward end as the hull curves in toward the pointy end of the boat. The
tank turned out to be just a teeny bit too big at the forward outside
corner. Oops.
Well, the tank is polyethylene, right. So I got out a heat gun and figured I'd soften up the corner of the tank until I could collapse it enough to fit, which meant reducing the height of the tank by about an inch over a six inch square area which was originally about two to three inches high. Having done it, this is not a project I would recommend to anyone. The poly is thick, does not conduct heat very well and transitions from solid to liquid over a very narrow temperature range. You want the tank soft enough to deform but not hot enough melt. Because the material is about 3/8 inch thick, it melts on the outside (or inside) where you apply the heat long before it gets soft enough all the way through. You can see what is going on because the material turns transparent when it melts and is translucent while its solid. As soon as it gets hot enough all the way through gravity wants to take over. And it's not like it cools down right away when you take the heat away. As carefully and slowly as I worked, I still melted a hole in the tank. Fortunately, I was working on a corner and could reposition the tank and flow the molten material back into the hole, using pieces of wood to push and/or support the plastic.
I tested for leaks by pressurizing the tank to some fraction of a PSI for several
hours. The flat walls want to 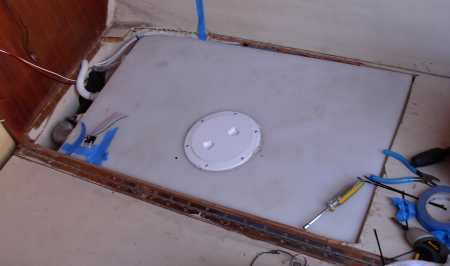 bulge out under very little pressure so this
is a delicate business. Thankfully, the pressure test was
successful. No leaks. Installed, the tank looks like it was poured
in place, which it was, sort of. There isn't a quarter inch to spare
anywhere. It's not at first apparent that the tank in the photo fully
fills the width under the settee because the bottom of the picture is a piece of
plywood attached to the edge of the settee by a piano hinge. Normally this
lays on top of the (missing) plywood covering the tank and is flipped out and
has hinged legs to transform the settee into a double berth on the Islander 28.
bulge out under very little pressure so this
is a delicate business. Thankfully, the pressure test was
successful. No leaks. Installed, the tank looks like it was poured
in place, which it was, sort of. There isn't a quarter inch to spare
anywhere. It's not at first apparent that the tank in the photo fully
fills the width under the settee because the bottom of the picture is a piece of
plywood attached to the edge of the settee by a piano hinge. Normally this
lays on top of the (missing) plywood covering the tank and is flipped out and
has hinged legs to transform the settee into a double berth on the Islander 28.
There were about four inches to spare on the forward end of the compartment
for plumbing connections. Just enough. The head is on the other side
of the bulkhead and the lines run along the hull and are almost all concealed by
the existing cabinetry. As is my normal practice, there is no Y
valve. The head discharges into the top of the tank. The bottom of the
tank goes to a tee which branches to the deck pump out port and to the
macerator. This works because the deck port is normally capped so the
macerator can pull a vacuum to empty the tank and the macerator seals well
enough that the tank can be suctioned out through the deck fitting as well.
Because the ports are all on the end of the tank, it is not possible to either fully fill or fully empty the tank. I placed the vent line (3/4" white hose in the photo above) so that it is uncovered at equal starboard or port angles of heel. I installed an external capacitance level sensor but am not very happy with it. Apparently because the foil strips are almost touching a painted bulkhead as well, the capacitance does not drop enough with an empty tank to register "empty" on the scale. I put this down to poor design on the part of the device maker. As an old instrumentation hand, I know that every instrument should have both a zero and a span adjustment. These folks only provide a span adjustment and assume the zero will take care of itself, which clearly it does not.
Here, ten or so inches down the page, is where the story gets interesting, or at least beyond cramming 28 gallons of tank into an 18 gallon space. Because La Mouette is my little experimental boat, I get to try offbeat solutions to problems. Three problems: How to empty a tank where the outlet starts sucking air two or three inches before the tank is empty? - and - How to figure out how full the tank is? A corollary problem involves the water tank level. The water tank is also poly, but its encased in wood on all sides and just too much of a pain to apply capacitance strips which don't work that well anyway. Finally, how to stop sanitation related odors?